Been really busy at work lately so haven't had much time to work on my PixelBlocks art. I figured I'd give an update on the process I go through to make these creations. Its sort of something I figured out on my own, and have been refining the process to make it easier and quicker for me to do.
1) I find a digital copy of the character I want to do online somewhere. There are quite a few websites that post "ripped sprites" from video games, so there's a lot to choose from. Couple of the sites I find them from are Game Sprite Archive and NES SNES Sprites.
2) Once I have the sprite, I convert it to a custom color palette in Photoshop. There are only 20 different PixelBlocks colors (and I own 18 of them), so this can be quite a challege. Some colors don't have an equivalent PixelBlock color, so I have to either fake it or skip doing that character entirely. Magus from Chronotrigger unfortunately was skipped for this reason; I didn't have a good purple. I've created both a palette file I can load into Photoshop and an action that I can run to quickly convert the file. Sometimes the conversion misses colors, and I have to undo and go back and manually change some colors first.
3) Once the image is converted to the PixelBlocks colors, I zoom in on the image in Photoshop and turn the grid on. The makes it easier to build the larger ones, because I can then count the number of blocks I'll need when putting it together. I take a screenshot of the zoomed image, although I suppose I could also simply increase the image size in Photoshop. The zoom is quick and easy to do. I save both a copy of the screenshot and the converted sprite for future use if I want to make one again.
3) Once the image is converted to the PixelBlocks colors, I zoom in on the image in Photoshop and turn the grid on. The makes it easier to build the larger ones, because I can then count the number of blocks I'll need when putting it together. I take a screenshot of the zoomed image, although I suppose I could also simply increase the image size in Photoshop. The zoom is quick and easy to do. I save both a copy of the screenshot and the converted sprite for future use if I want to make one again.
4) I open the screenshot and then start building. I have a bunch of plastic containers on my desk with the different colors sorted out. I start from the top of the image and work my way down, adding blocks one pixel at a time. I don't really have a system for keeping track of where I am, and usually will leave off working on it after completing a section like and arm or head or something so I can pick up where I left off.
5) Once the 2D sprite is built, I make a base so it can stand up at my desk and snap a picture of it. Its better to take a pic of it standing up, because some of the blocks are darker and its better with light shining through them to better define the colors. Otherwise they look like black.
5) Once the 2D sprite is built, I make a base so it can stand up at my desk and snap a picture of it. Its better to take a pic of it standing up, because some of the blocks are darker and its better with light shining through them to better define the colors. Otherwise they look like black.
Thats it. There's a couple of other things I'd like to mention. On the PixelBlocks website there is a web application called Digital Stained Glass. Its a great program for taking your images and converting them into blueprints to make your own items. I like to have a lot more control over the items I create, so its not as simple as just running an image through the program for me. I use Digital Stained Glass to count the number of blocks I'll need for an image, as it will count pixels for me and spit out how many of each color you'll need to build it. Also a note on size and price. The blocks themselves are about 3/8 of an inch wide. Even very small images will translate to pretty large items. For your consideration:
sprite, actual size: 
zoomed image (blueprint): 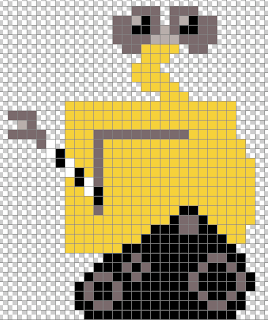.png)
actual dimentions of finished product: 11 inches high, 8 1/2 inches wide
total number of blocks needed: 503 (not counting the base)
breakdown of blocks: 269 yellow, 138 black, 83 grey, 7 light grey, 6 clear/white
Pixelblocks sell for $8.00 per 200 blocks, or about $0.04 per block. I actually considered building these out of Legos at one point, but they are actually more expensive at $0.07-$0.08 a block, and there are only 17 colors instead of 20. Wall-e would cost $20.12 to build in PixelBlocks, and $35.21 in Legos.
I hope you've enjoyed the insight into my process. Once I figure out a good cheap way to mount these items, I'd like to do commission based work. One of the challenges I have is lighting, as they look best with backlight. I've looked into framing them, which would work for some items, but anything that uses olive, dark red, dark blue, brown, light grey or dark grey will need backlight to better see the colors.
Could you please publish what are the colors (color codes) you use for that palette? I am exploring a way to make Pixelblocks blueprints out of photographs in Photoshop/GIMP. Thank you in advance.
ReplyDeleteIf you're using Photoshop, you can import this swatches file:
ReplyDeletehttp://files.me.com/dash16/c0dqrc
Actually, I'm using GIMP, and have no way to open that file. A screenshot of the palette with be just enough, if you would be as kind as to post it. I can extract the colors from such image. Once more, thanks.
ReplyDeleteNo problem, here's a screenshot of the palette:
ReplyDeletehttp://files.me.com/dash16/sspzd3
Thanks a million :)
ReplyDeleteCould you suggest a different site for pixel grabs? Both sites you mention appear to be spyware-ridden...
ReplyDeleteSpyware ridden? Hmm, guess I never noticed on my Mac.
ReplyDeleteHere's a couple of other sites you can try:
http://sdb.drshnaps.com/
http://www.vgmaps.com/
http://www.vgmuseum.com/rips/snes/
http://www.panelmonkey.org/category.php?id=1
Thanks for sharing your process. Looking at the potential of pixel blocks really got my creative juices going. I had to pick up a box at puzzle zoo yesterday when I first saw these. Keep up the great work!
ReplyDeleteThanks for the compliments! I'm glad I can be an inspiration to other potential pixelblocks artists and would love to see your work.
ReplyDelete